
Welcome to the fast track to getting your Google Tag Manager container set up. Here, we’ll show you how to import a container into Google Tag Manager (GTM) and, as a bonus, we’ll also give you our readymade GTM starting recipe designed to help marketers and small business owners quickly add common website tags to their website.
As veteran marketers with extensive tagging & tracking experience, we know that setting up your GTM container, whether it’s your 1st or your 51st, requires many of the same foundational tasks regardless of how it’ll be used in the end. Luckily, Google Tag Manager offers the ability to import “recipes” into an existing Tag Manager container so that you can speed up this process.
Follow the instructions below to learn how to import a Google Tag Manager container. If you already know how to import a Google Tag Manager container and you’re just looking for our free starting GTM recipe, feel free to skip ahead.
What Is A GTM Recipe?
By itself, GTM doesn’t do a whole lot. It’s sort of like an empty box… err… container waiting to be filled. We must therefore add the requisite components to the container in order to track what we need on our website. This is where importing GTM container files, commonly called GTM Recipes comes in handy.
A GTM Recipe is a .json file that allows users to easily add a preconfigured GTM setup into their existing GTM Container tag. Much like the more commonly used version of the word, these “recipes” are made up of GTM ingredients (tags, triggers, and variables) used to tag your website. Using recipes can help speed up the process of cooking up your favorite tagging meals or help you concoct something that might be beyond your expertise in the metaphorical tagging kitchen.
Pro Tip: In most cases, we recommend using only one GTM container per website and only one website per GTM container.
Instructions On How To Import A Google Tag Manager Container
Before we can import a Google Tag Manager container, you’ll need to make sure you have a GTM account created. Once that’s created, you’ll be able to set up your first GTM web container and import any helpful GTM recipes, like ours below, that you find to easily build out your container and track your website usage.
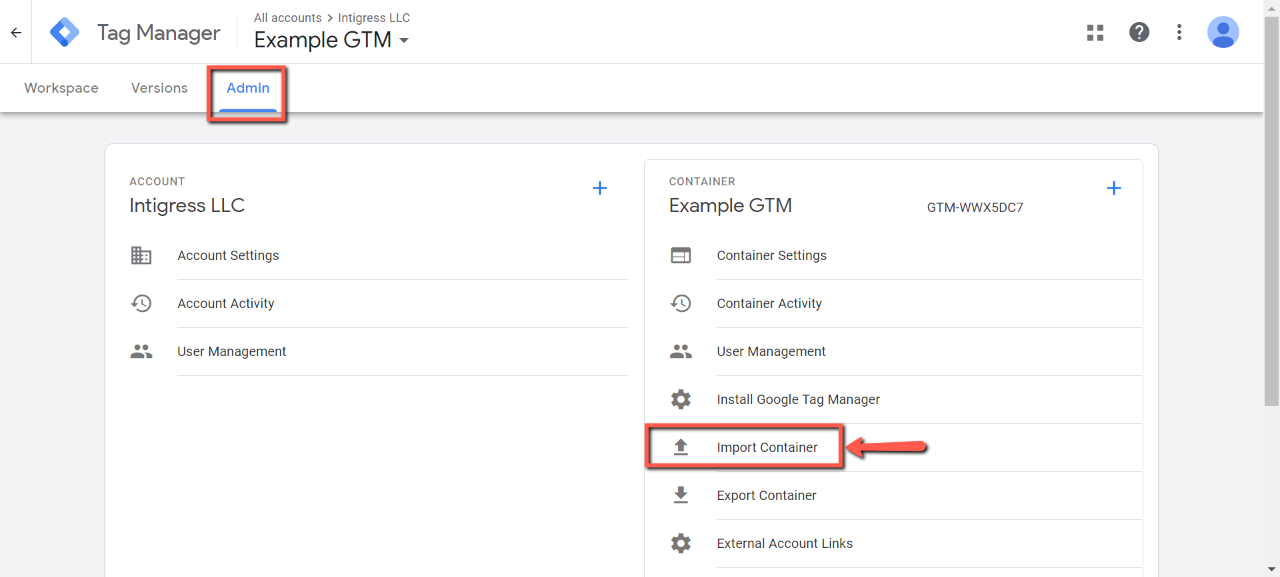
- Navigate to tagmanger.google.com and sign in. From the GTM Admin screen, Select “Import Container”`
- You’ll then be presented with the Import Container screen. Click the “Choose Container File” button and select the .json file you’d like to import into this GTM container. Skip down to our Premade Starting GTM Container below if you don’t already have an importable container file.
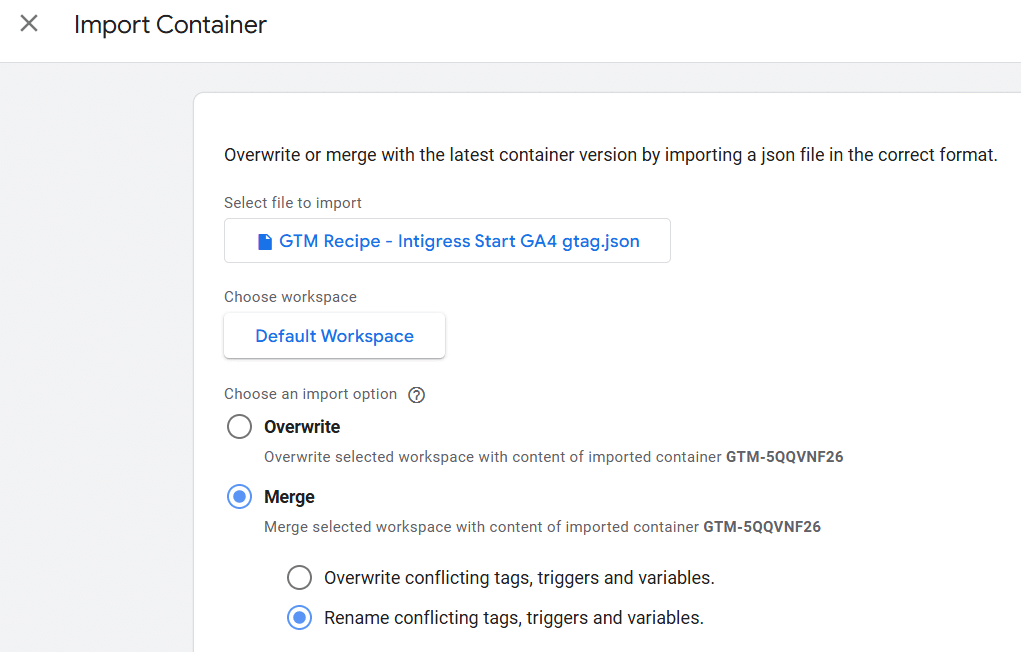
- Next, Choose the Existing workspace, then click Default Workspace (or whatever your current workspace is named)
- After that, you can choose to Overwrite or Merge (recommended) the import file with any existing tags, triggers, and variables in your selected workspace.
- Use Overwrite if you’d like to replace everything that’s in your selected GTM workspace with the imported GTM file. Important: This will erase anything that’s currently in your GTM container.
- Use Merge to combine your current tags, triggers, and variables with the tags, triggers, and variables from the imported file. If selected, you will then be able to choose if you’d like to overwrite conflicting items or rename them. In most cases, we recommend renaming them to be safe.
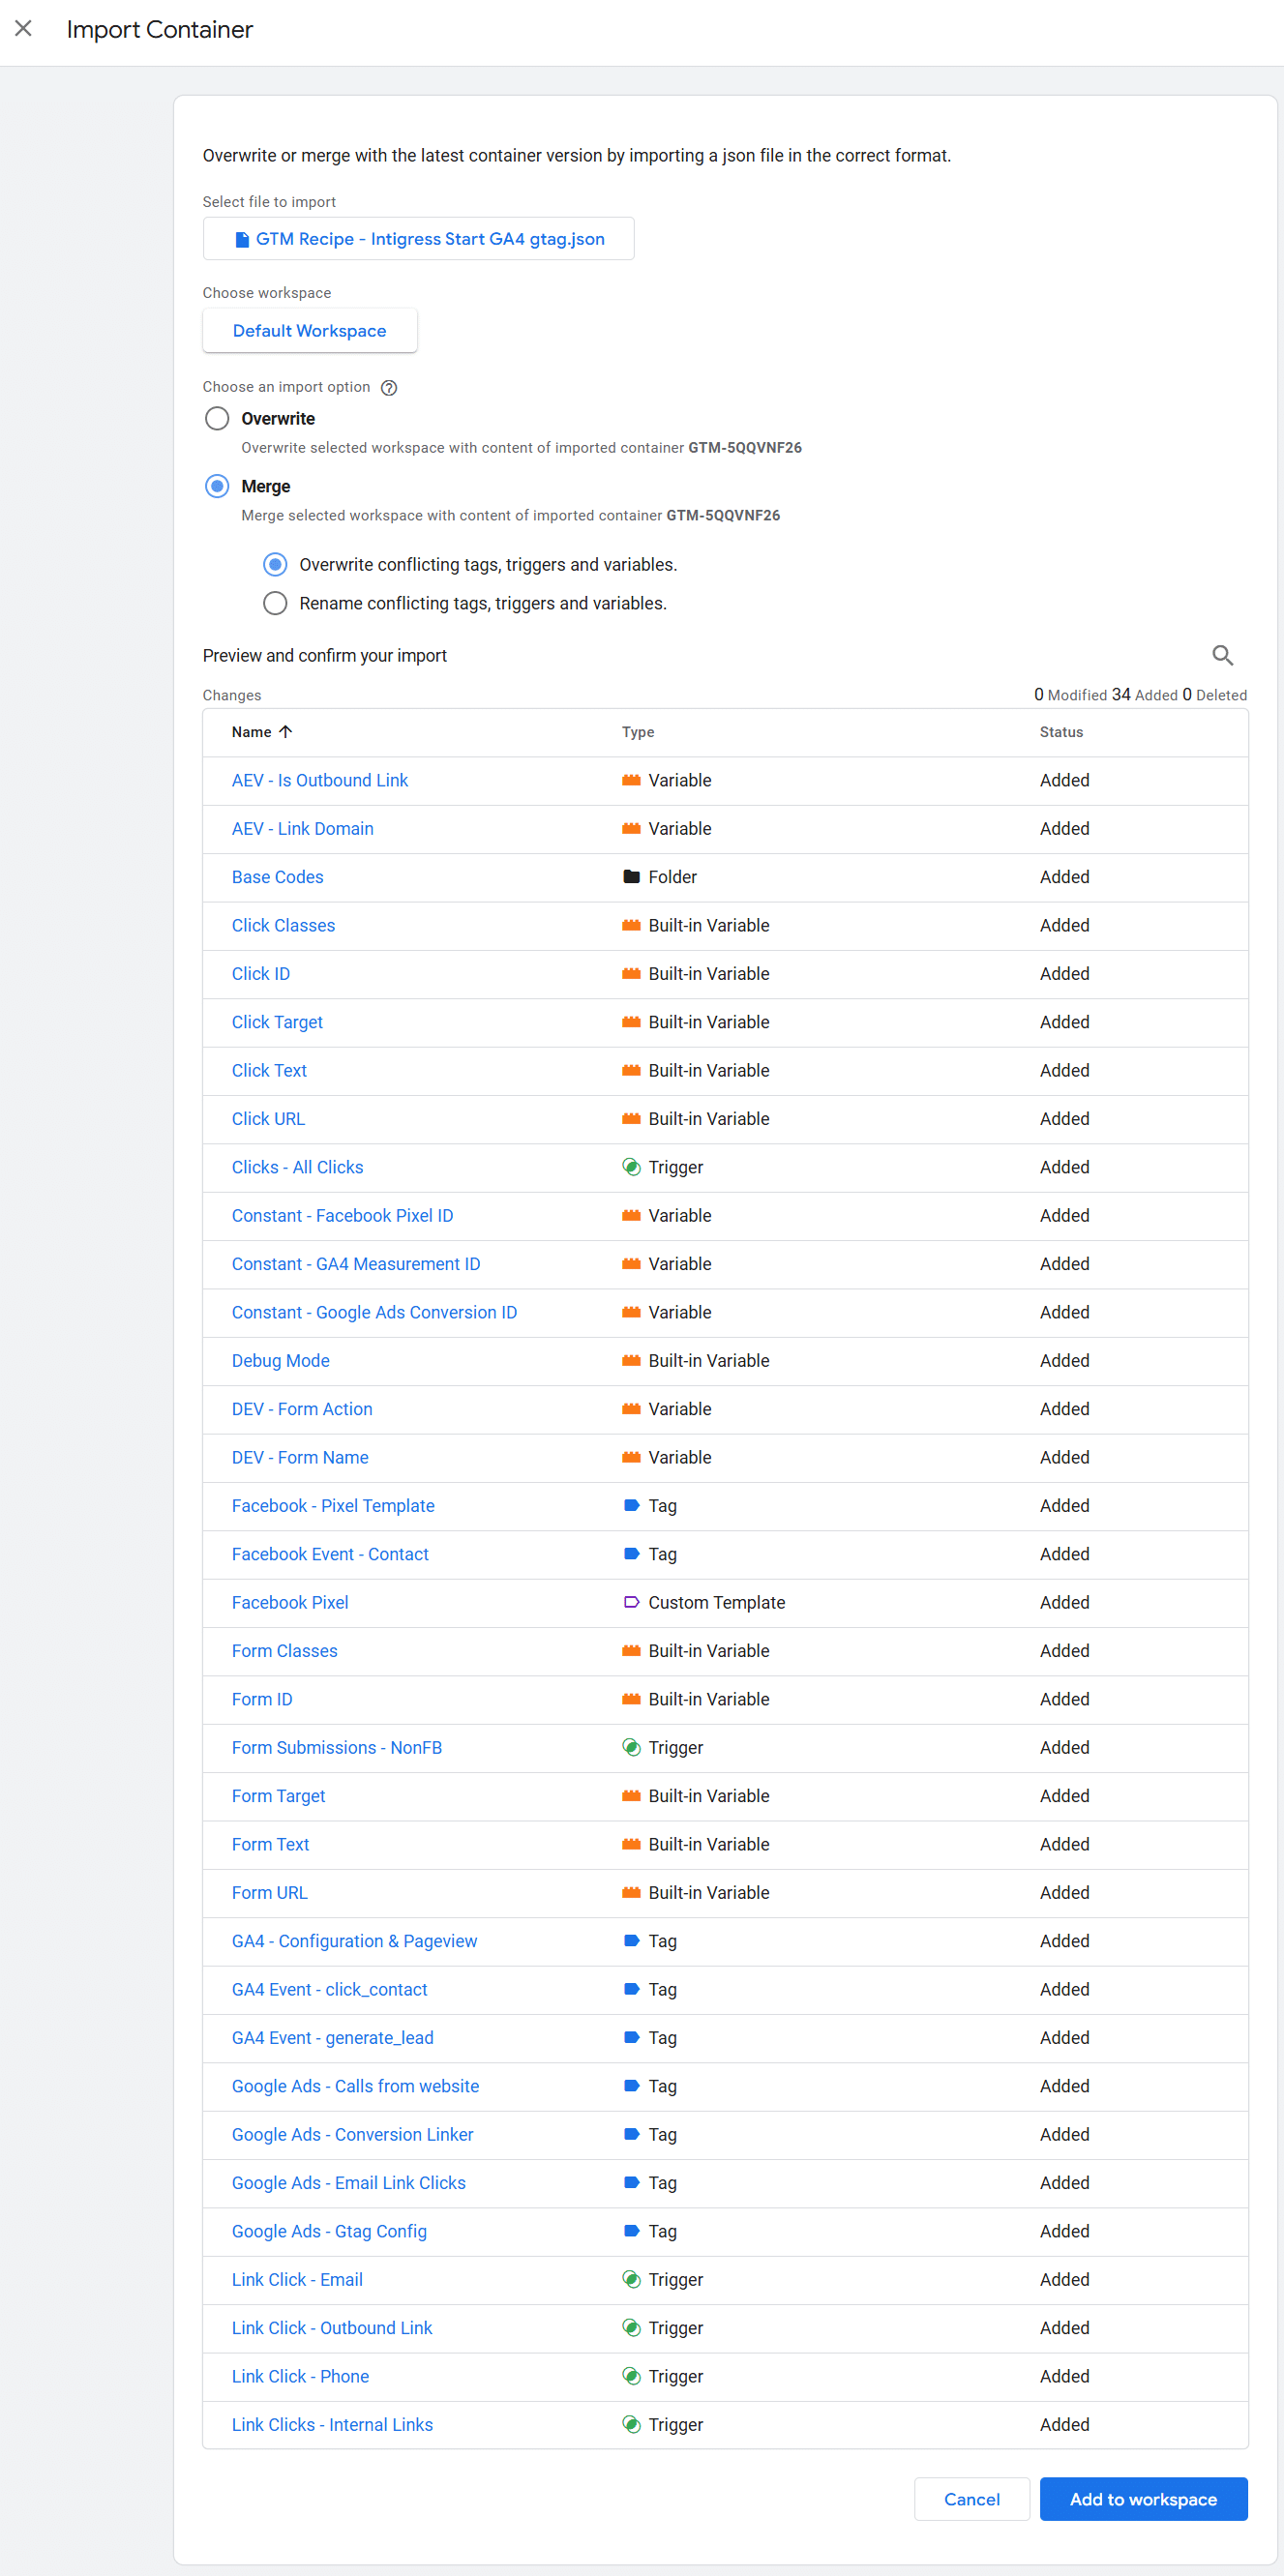
- Lastly, ensure that everything in the preview looks correct, then click confirm to import your container.
That’s it. You now know how to import a Google Tag Manager container and can use this method to import the Intigress GTM Start Recipe below to be well on your way to using GTM to track your website usage.
Our Starting GTM Container Recipe
Importing our starting GTM container recipe helps you easily add many of the basic tags, triggers, and variables marketers need when setting up a GTM container for the first time. Whether this is your 1st time setting up a Google Tag Manager or your 101st, this free GTM recipe will get you to the same starting point we use to help our clients with their website tagging & tracking.
What’s Included in the Intigress Start GTM Recipe?
At a high level, here’s what you’ll get after importing our premade, starting GTM recipe.
- Base Tags
- Google Analytics 4 Config & Pagview gtag
- Google Ads gtag – Paused by default
- Facebook/Meta Pixel – Paused by default
- Conversion Linker tag – Paused by default
- Event tags (no setup needed)
- GA4 event tag for “clicks_contact” – Tracks mailto: & tel: link clicks
- GA4 event tag for “generate_lead” – Tracks HTML form submission – Paused by default
- Facebook/Meta pixel tag for “Contact” standard event – Tracks mailto: & tel: link clicks – Paused by default
- Google Ads Calls from website – Tracks calls to a phone number on your website – Paused by default
- Google Ads Email Link Clicks – Tracks mailto: link clicks – Paused by default
- Variables
- 5 Click variables enabled
- 5 Form variables enabled
- GA4 Measurement ID constant variable – Needs configuration
- Google Ads conversion ID constant variable – Needs configuration
- Facebook Pixel ID constant variable – Needs configuration
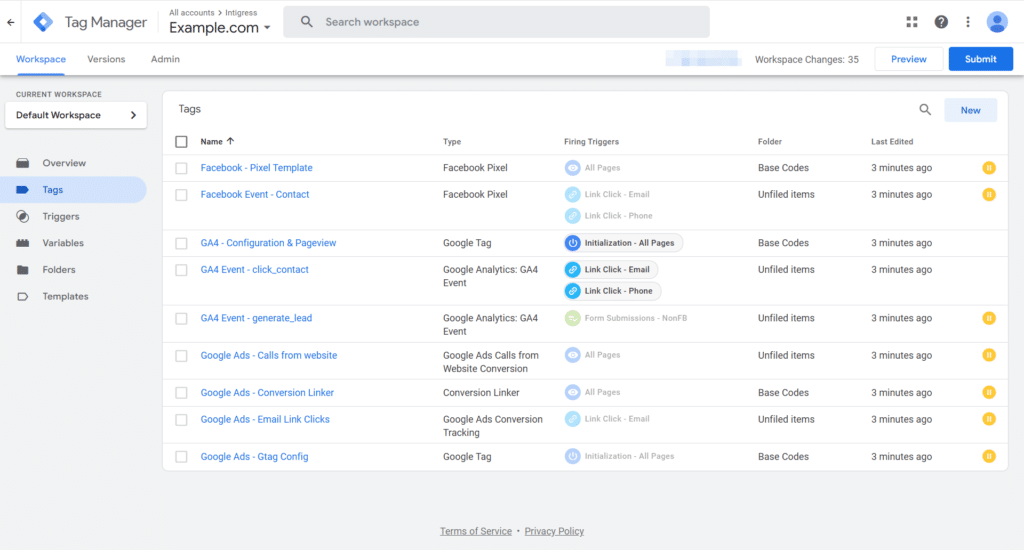
After import, this is what the detailed view looks like at the time this article was published. However, please note that we are constantly making improvements to our starting GTM container recipe so this may change over time.
Before Getting Started
While most of the container is set up for you, there are a few things that need your configuration. In order to make this process faster, make sure you have the following information on hand before you import this GTM container recipe:
- Google Analytics 4 Measurement ID: G-XXXXXXXXX
- Google Ads Conversion ID (just the numbers with out the “AW-“)
- Meta/Facebook Pixel ID
Make sure you follow the instructions exactly, but if you get stuck at any point in the process, feel free to reach out to our team and we’ll be happy to help get you unstuck.
Intigress GTM Start Recipe Configuration
Pause/Unpause Tags
As mentioned above, all Universal Analytics and Facebook tags are paused by default since not every site uses them. If you are only using Google Analytics 4 and not using Universal Analytics or Facebook Pixel, feel free to move on to the Update Variables section below after importing this GTM container.
Update Constant Variables
In order to make the tags in this recipe work, you tell them to send data to your specific accounts by updating a few variables.
- After importing our starting GTM recipe, click Variables on the left-hand side of the GTM Overview page.
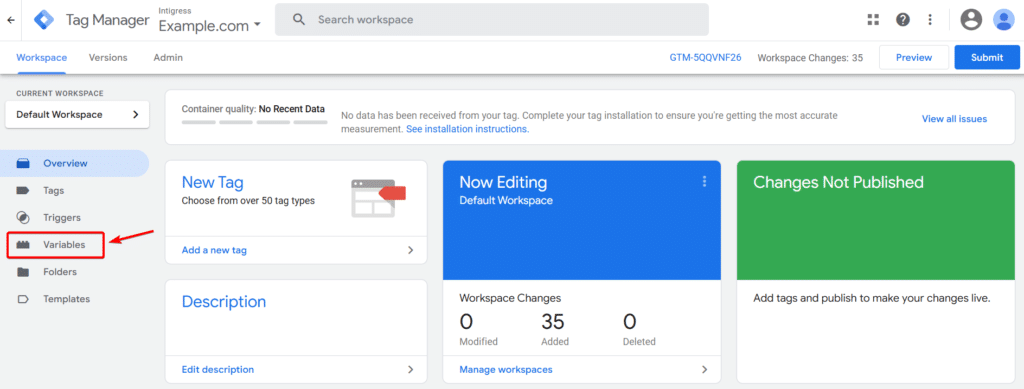
- Scroll down to the “User-Defined Variables” section. From here, there are 3 changes that you need to make:
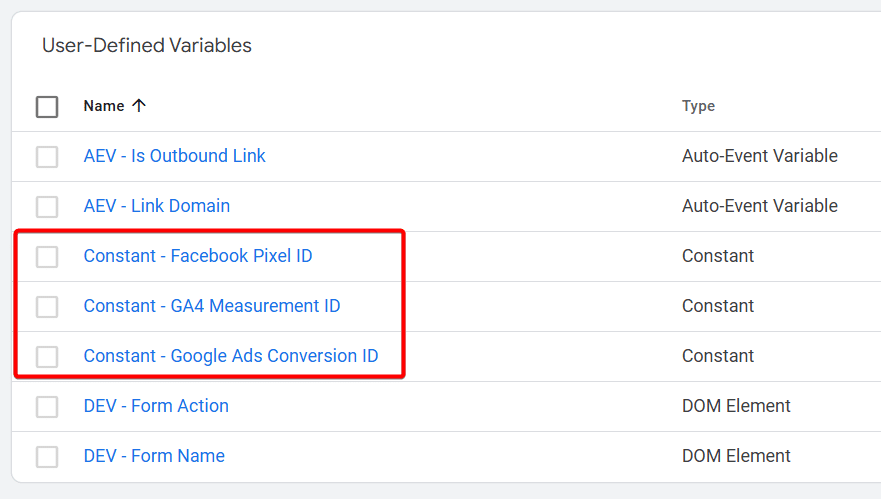
Pro Tip: You are not required to use variables to store your GA4 Measurement ID, Meta Pixel ID, or your Google Ads Conversion ID, but we feel it helps maintain uniformity and makes it easier to reuse these IDs in your tags.
Google Analytics 4 Measurement ID Variable
- Update “Constant – GA4 Measurement ID” variable
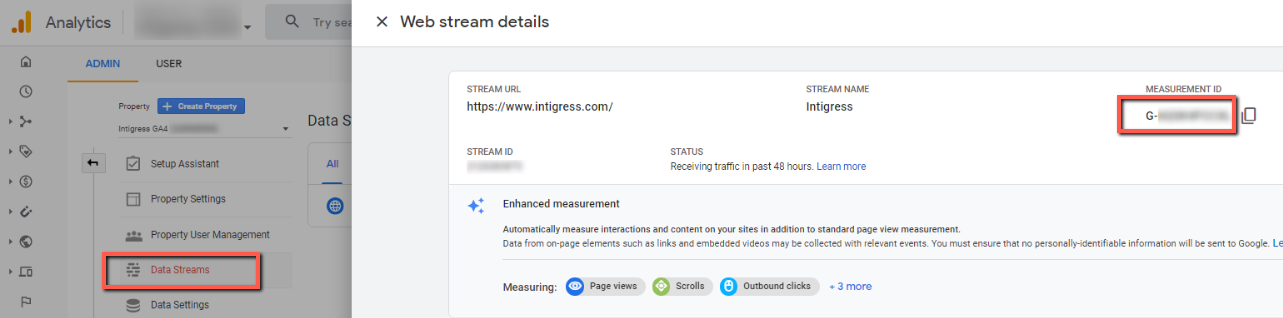
- If you are using Google Analytics 4, this is where you can insert your Google Analytics 4 Measurement ID. Insert your Measurement ID for your GA4 Data Stream in the Value field instead of “G-AB12CDE3F”, then click Save.
- Your GA4 Measurement ID can be found by choosing your website under Data Streams in the property level of your GA4 admin settings. It starts with “G-”
Google Ads Conversion ID Variable
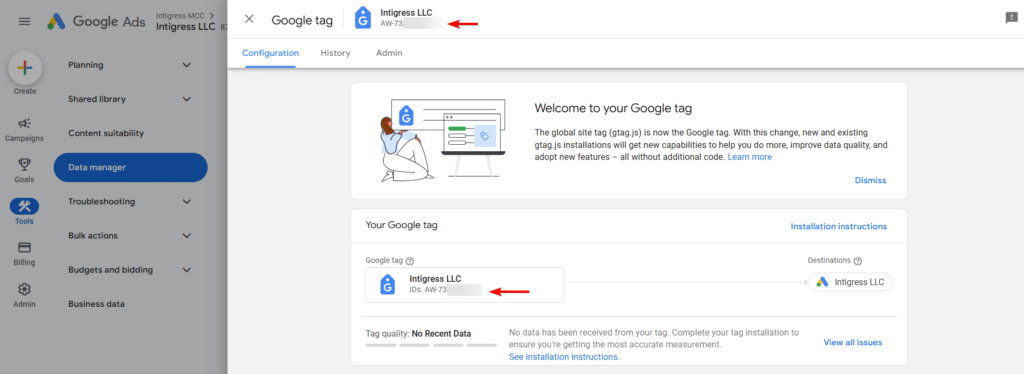
- Update “Constant – Google Ads Conversion ID” variable
- If using Google Ads, you can find your Google Ads Conversion ID by clicking Tools > Data manager > find your Google tag > click Manage
- Your Conversion ID is the numbers of your Google tag after (not including) the “AW-”
- Note: Make sure you DO NOT include the “AW-” in your Constant variable or your Google Ads gtag will fail to load correctly. We have manually added the “AW-” to your tag for you so you can use the same constant variable for your Conversion ID on your Google Ads Conversion tags.
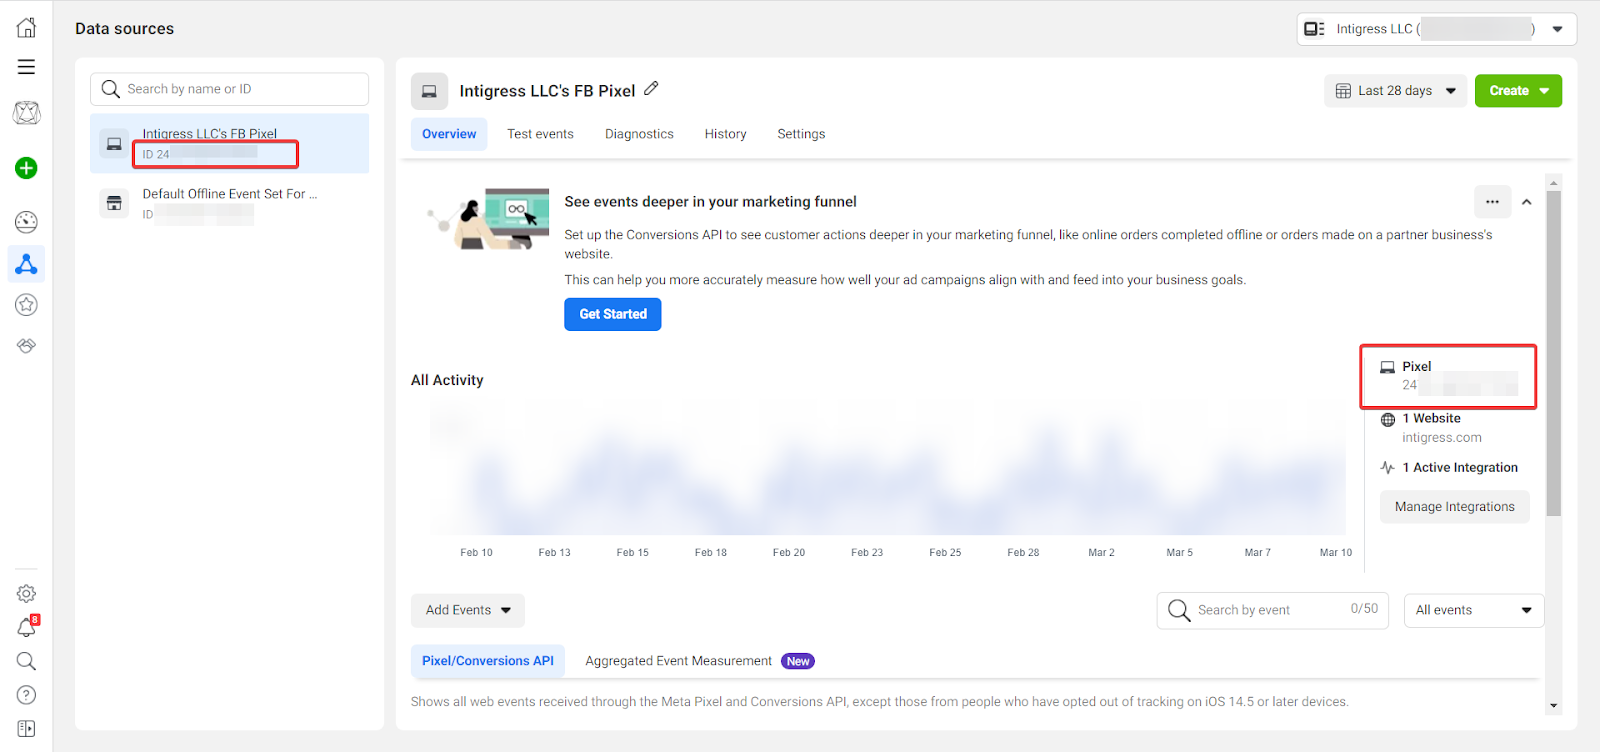
Meta/Facebook Pixel ID Variable
- Update “Constant – Facebook Pixel ID” variable
- By now you should have a hang of it. Similar to #3 and #4 above, you can insert your Facebook Pixel ID in this constant variable by updating “000000000000000” in the Value field with your actual Pixel ID, then clicking Save.
- Your Pixel ID can be found by logging into your Facebook Events Manager or in your Business Manager Settings under Data Sources > Pixels.
Publish Your GTM Container
As always, we encourage you to use GTM’s Preview Mode to test and debug your container before publishing. If you haven’t already, you’ll need to make sure you’ve added GTM to your website. You’ll also need to publish your GTM container before you can use GTM’s preview mode to test and debug.
Once you’re satisfied with the setup of your imported GTM container, then go ahead and make sure all of your changes are published. Once they are, you’ll have Google Analytics 4, Google Ads, and Facebook pixel tags up and running.
Congratulations on importing a GTM container!
What’s Next?
Importing our Google Tag Manager container opens the door for all kinds of cool tagging and tracking. Your final GTM setup may differ depending on your type of business, the size of your website, and many other factors, so be sure to think about your ideal measurement strategy so that you can make better business decisions using the information you collect via GTM.
If you need assistance with setting up or importing your GTM container, feel free to reach out to our tagging experts and we’ll be happy to answer any questions you may have.