
Business owners and marketers are bombarded with and even inundated with data, but not all data is created equal. The best kind of data is clean, usable data, and when it comes to website tracking and tagging, being able to differentiate between your customers and your internal users is key.
In this guide, we’ll show you how to track internal traffic in Google Analytics by creating a first-party cookie with Google Tag Manager. Because this is an advanced guide, let’s start with some information about internal traffic to make sure we’re all on the same page.
What is Internal Traffic?
In general, internal traffic is defined as website traffic from internal users. This could be an engineer or a web developer fixing bugs on your website, a content specialist writing blog content, a business owner or employee looking for resources to send to a prospective client, etc. While all of these users may be on your website, they aren’t using it in the same way a customer might be using it.
By extension, this means that external traffic is any traffic from website users that wouldn’t be considered internal users, such as your customers. This is, quite literally, where the money’s at because these external users are the ones that may become your customers.
Why Track Internal Traffic vs External Traffic?
Perhaps the biggest reason to track internal traffic vs external traffic on your website is that they find and use your website differently. Internal traffic that’s more familiar with the site may visit the same pages frequently or directly type in your website URL whereas external traffic will probably find your website for the first time after searching for a relevant SEO keyword using a search engine or through a paid ad placement.
If you’re tracking your website users in Google Analytics without tracking your internal traffic separately, you might see inflated user numbers. If you’re using that combined data, you could be making incorrect assumptions about your customers or wasting money optimizing your website toward how your internal traffic uses it instead of how your customers (and potential customers) use it.
That’s why we recommend identifying your internal users and your external users.
Identifying Internal Users
Obviously, the first step in tracking internal users is to identify them. Unfortunately, there are no fool-proof ways to identify your internal users vs your customers, but here are 4 of the most common.
IP Address
The most common way to identify internal users is using IP addresses. Your IP address is a way to identify your unique device on the internet. To find your public IP address, you can type in “What is my IP” into Google.
If all employees or internal users work at an office, you can exclude that IP address from Universal Analytics or Google Analytics 4. However, since many people nowadays have multiple devices, work remotely or travel from work, this is becoming a less and less reliable way to identify your internal users.
Logged In Users
Another way to identify internal users is if the user is signed in or not. However, not every website has sign in capabilities, and in practical terms, most employees aren’t going to want (or remember) to log in every time they need to visit your site.
Hidden Page
Instead of logging in each time, it may be easier for your internal users to just visit a certain hidden page each time. You can then segment or filter out sessions where a user visits that page. Again though, this requires them to remember the URL and be diligent about visiting that page during each session on your websites. There is also the slight change of a curious external user finding that hidden page (even if it’s deindexed) and then mistakenly be excluded.
1st Party Cookies
The last solution we’ll discuss, and the one we’ll show you how to use below, is creating a 1st party cookie when an internal user takes a certain action such as adding a simple URL query parameter.
While using this method requires your internal users to activate it on each device they visit the website from, they only have to do it once and then they are covered for an entire year (as long as they don’t clear their cookies).
This certainly isn’t an exhaustive list of ways to identify internal traffic in Google Analytics, but if you’re interested in using this 1st party cookie method to track internal traffic, keep reading for our instructions below.
Creating a First Party Cookie To Track Internal Traffic Using GTM
Before we get started, this guide on how to track internal users in Google Analytics assumes that you have Google Tag Manager installed on your website and are using Google Analytics for website tracking.
After following the steps below, your internal users can add the 1st party cookie to their devices simply by visiting any page on your website with “?internal=true” (without quotes). That user’s device/browser profile will then create a cookie with a value of Internal that will be stored in their browser and all of their website visits will be marked as internal traffic for 1 year.
Download GTM Recipe
First, download our Internal Traffic Cookie GTM Recipe below.
If you used our Intigress Starting GTM Recipe, everything you need is already included so you can skip this download and move on to updating the mainDomain variable.
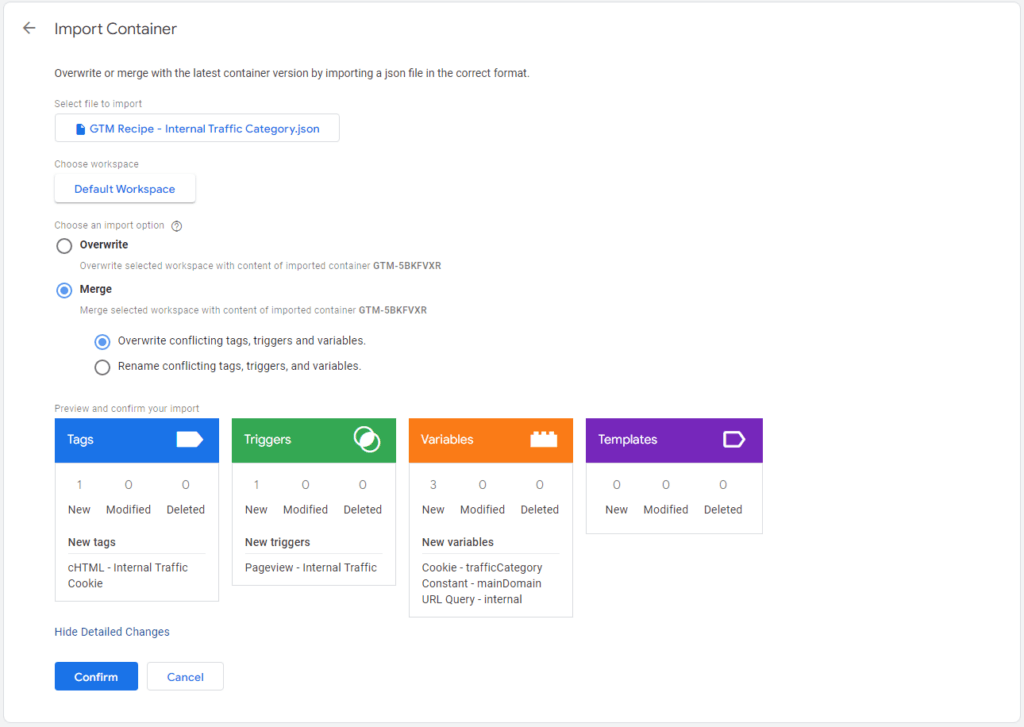
Import GTM Recipe
Open up Google Tag Manager, and import our recipe into your GTM container. We recommend using the Merge, then Overwrite method (instead of rename).
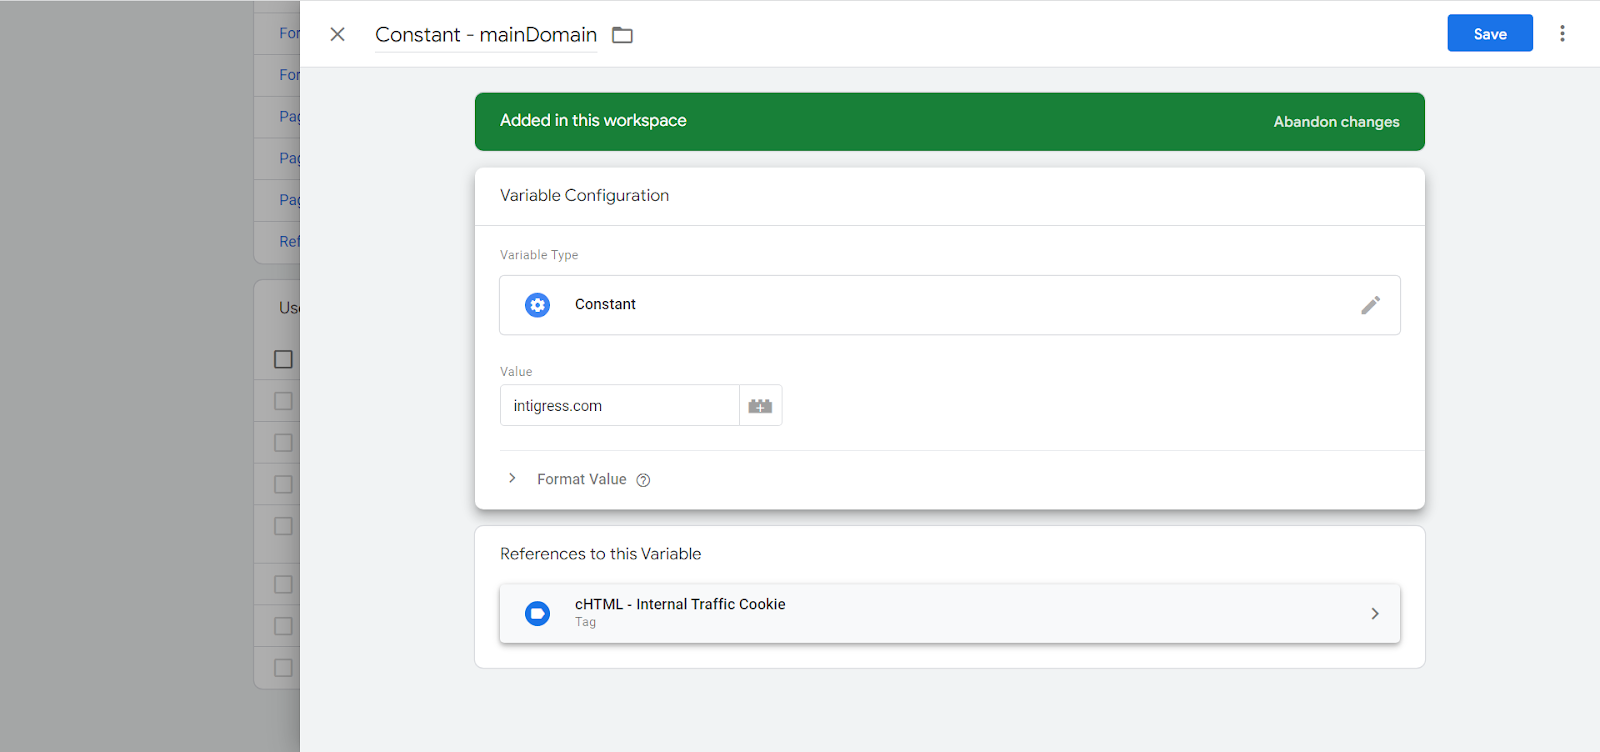
Update mainDomain Variable
In your User-Defined GTM variables, find the one called “Constant – mainDomain” and replace the exampledomain.com value with your domain. (i.e. intigress.com), then click Save. Do not include any http:// or https:// or any subdomains like www. Just your main domain.
Here is where it starts to get different based on if you’re using Google Analytics 4 or Universal Analytics. Let’s see how to use this recipe to track internal traffic in GA4 first.
Track Internal Traffic in Google Analytics 4
Google Analytics 4 does natively support excluding internal traffic, but you can only do it by filtering IP addresses at this time. You can, however, segment internal vs external users by including a user property with your events.
Pro Tip: The difference between filtering and segmenting is that filtering prevents the data collection when certain criteria (i.e. an IP address) is met whereas segmenting collects all the data, but gives you a way to differentiate or hide it. We recommend using segments over filters in most cases.
Add User Property To GA4 page_view Event
- After updating the mainDomain variable in the step above, go back to the Tags section of the Google Tag Manager UI and find the tag that is of “Google Analytics: GA4 Configuration” type if you’ve used GTM to add your GA4 configuration and page_view tag.
- Click into your tag and add a new User Property with a Property Name of “traffic_category” (without quotes) and select the “Cookie – trafficCategory” variable as the Value using the lego button.
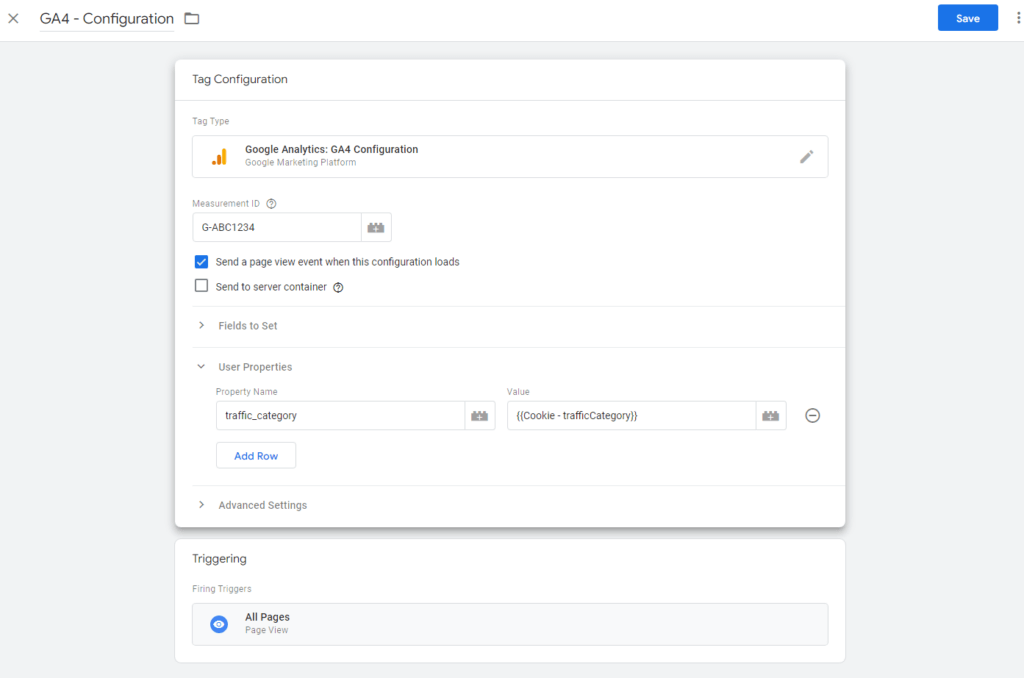
- Next, click Save.
Pro Tip: In GA4, all non-page_view events inherit parameters and user properties set when the page_view event fires. This means that any subsequent GA4 events will also inherit the value of the Cookie – trafficCategory value unless explicitly set otherwise.
Register User Property in GA4
- Log into your Google Analytics 4 property by heading to analytics.google.com.
- Click Configure, then Custom definitions
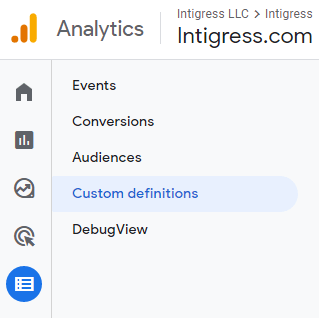
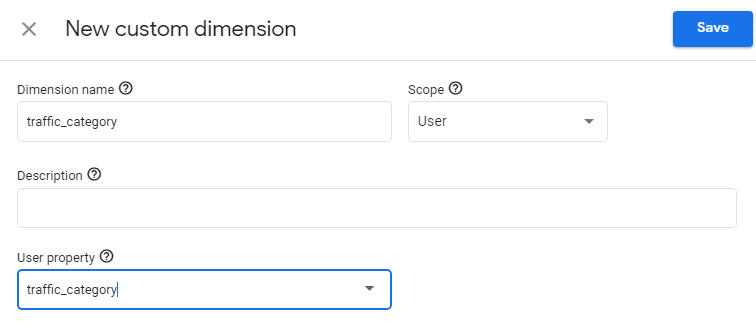
- Click the blue “Create custom dimensions” button and a new side menu will pop out.
- Enter the name of your user property in the User Property field making sure it matches what you added in the step above. If you’d like you can give it a different, more user-friendly name in the Dimension Name field or just use the same name.
- Select User from the Scope dropdown, then click Save.
That’s pretty much it for GA4. If you aren’t using Universal Analytics, feel free to preview, debug, and publish your GTM container. After you’ve added the 1st party cookie to a few devices, you’ll be able to segment your users using GA4 comparisons to see which events came from internal users and which ones came from external users.
Track Internal Traffic in Universal Analytics
Create A Custom Dimension
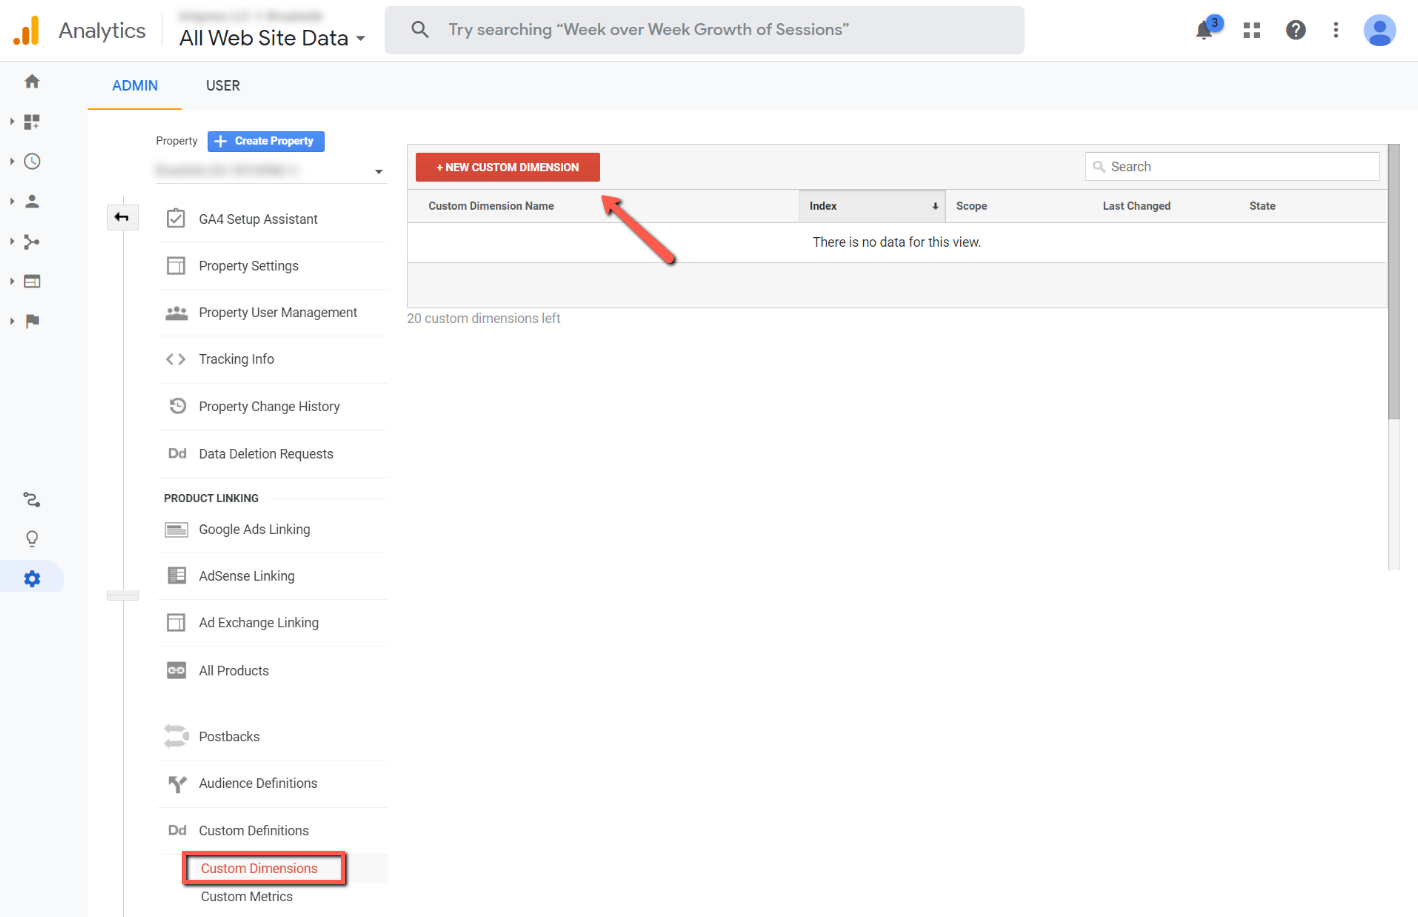
After updating the mainDomain variable above, log into your Google Analytics account and navigate to your Universal Analytics property level admin settings by clicking the gear icon.
- Click Custom Definitions, then Custom Dimensions
- Click the red “+New Custom Dimension” button
- Give your dimension a unique name, like “trafficCategory”
- Change the Scope to User, and make sure the Active checkbox is checked.
- Click Save. The only information you’ll need from the code on the right is the dimension number. You won’t be needing the rest of the code since you’re using GTM.

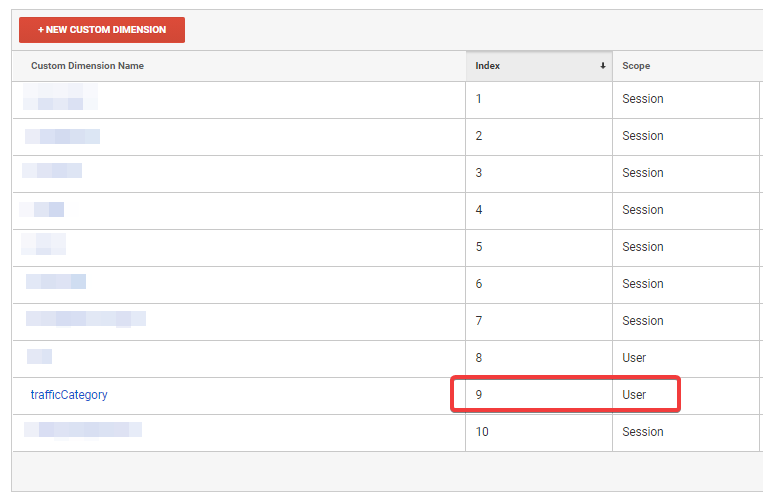
- After you’ve hit Save, you’ll be able to see the index number more clearly on the next screen
Pro Tip: You may need to refresh your Google Analytics page before your new custom dimension appears in the UI.
Exclude URL Query Parameters
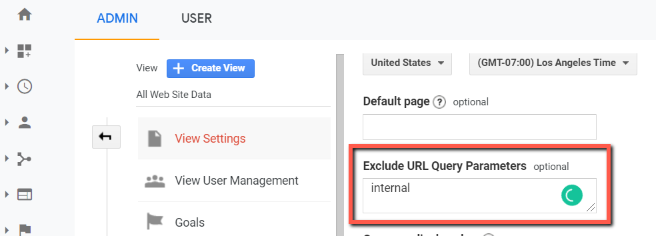
In your Universal Analytics admin settings, click on View Settings then scroll down to the “Exclude URL Query Parameters” section, add “internal” into the text box, then click Save at the bottom.
Add Dimension Index to your Google Analytics Settings Variable in GTM
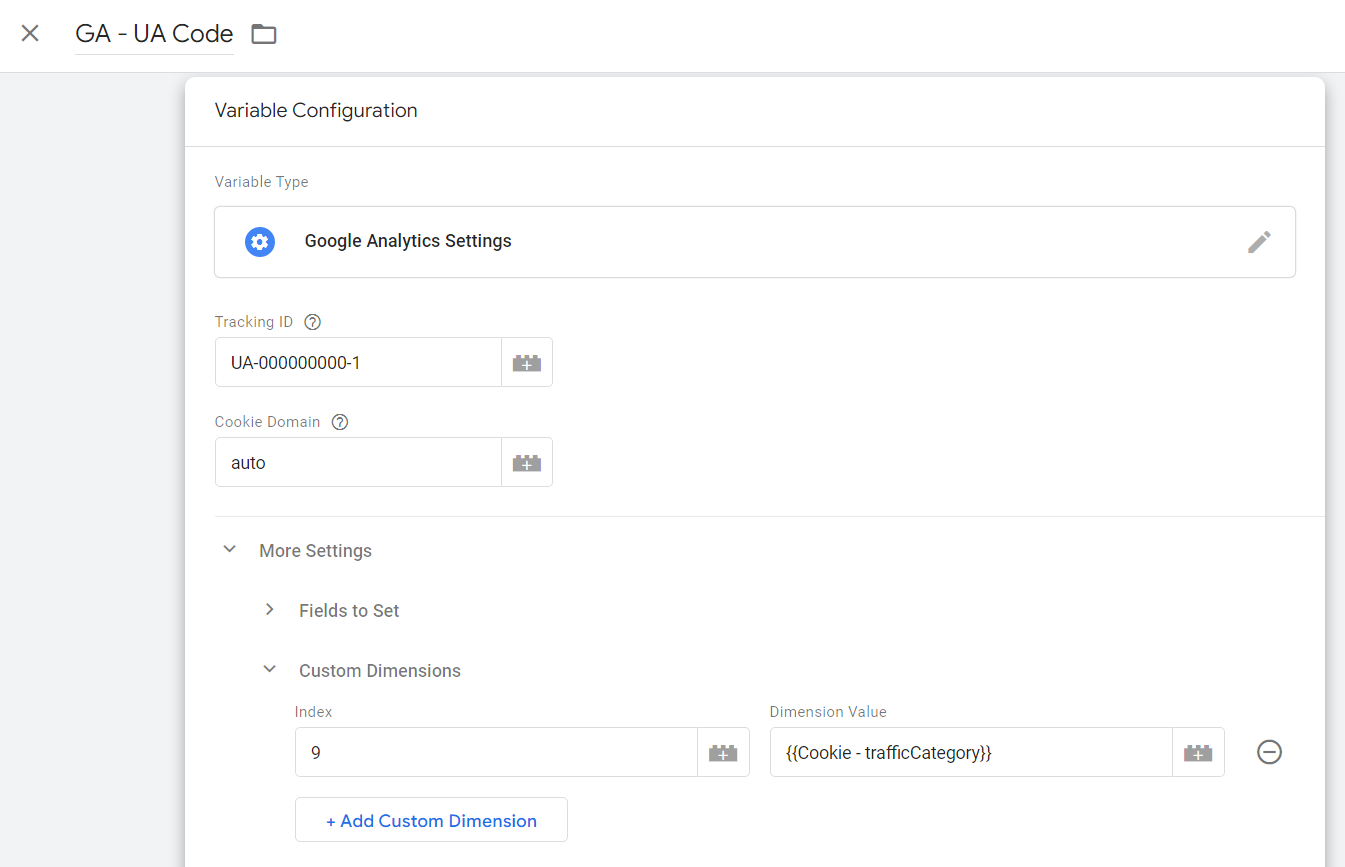
Go back to Google Tag Manager and click into your Google Analytics Settings variable that stores all of your Universal Analytics settings.
- Expand “More Settings” then “Custom Dimensions.”
- Add your index number in the Index field. In our example, we used 9 (see screenshots above).
- For the Dimension Value, click the lego brick to find the 1st party cookie variable called “Cookie – trafficCategory.”
- Save your updated Settings variable.
Preview & Publish Your GTM Container.
As always, we recommend that you preview your changes using GTM’s preview mode and then publish the container once you’re satisfied.
How To Add The Internal Traffic Cookie To Internal Users’ Devices
After you’ve published your changes in GTM, the last thing you need to do is actually add the 1st party cookie to your internal users’ devices. Your internal users can simply visit any page on your website with “?internal=true” appended to it (i.e. https://www.exampledomain.com/?internal=true) and the cookie will automatically be created.
Pro Tip: Don’t forget to add the question mark (?) and if there are any other URL parameters on your URL, make sure to replace it with an ampersand (&) as only the first URL parameter should use a question mark.
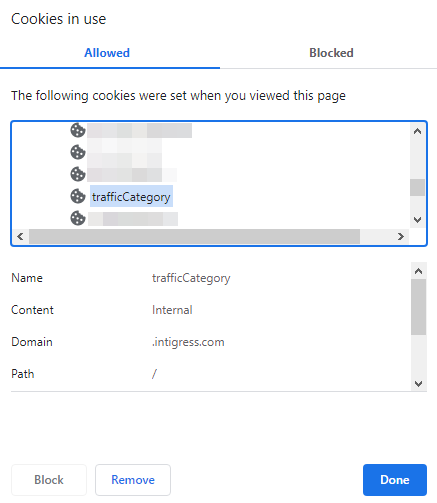
Google Tag Manager will then store a 1st party cookie called “trafficCategory” in that user’s browser with a value of “Internal” (without quotes). The cookie will last for 1 year or until that user clears their cookies. If your internal users access your website from multiple devices or incognito, then they will need to visit the URL with the parameter appended on every device, browser profile, or incognito window they use to access your website. Any users without a “trafficCategory” cookie with a value of “Internal” or without the cookie at all, will be marked as External traffic in Google Analytics by default. You can also change your status from Internal to External by clearing your cookies or adding “?internal=false” to your URLs.
To confirm the cookie has been successfully added, click the lock icon before the URL in Chrome or reviewing your cookies in the Application section of Chrome Dev Tools.
Pro Tip: If you want to get fancy, you can update the triggers to fire the internal traffic cookie when an user visits on a hidden page that only internal users know about (such as a log-in page) or, if available, use a datalayer variable to identify if the user is logged-in then trigger the creation of the cookie. These more automatic solutions are more ideal because they require less action from your internal users, they wouldn’t have to remember to do it, and it would be less annoying to them.
Over time, you’ll be able to differentiate internal traffic vs external traffic by segmenting the traffic_category user property in GA4 or adding the “trafficCategory” custom dimension as a secondary dimension in Universal Analytics.
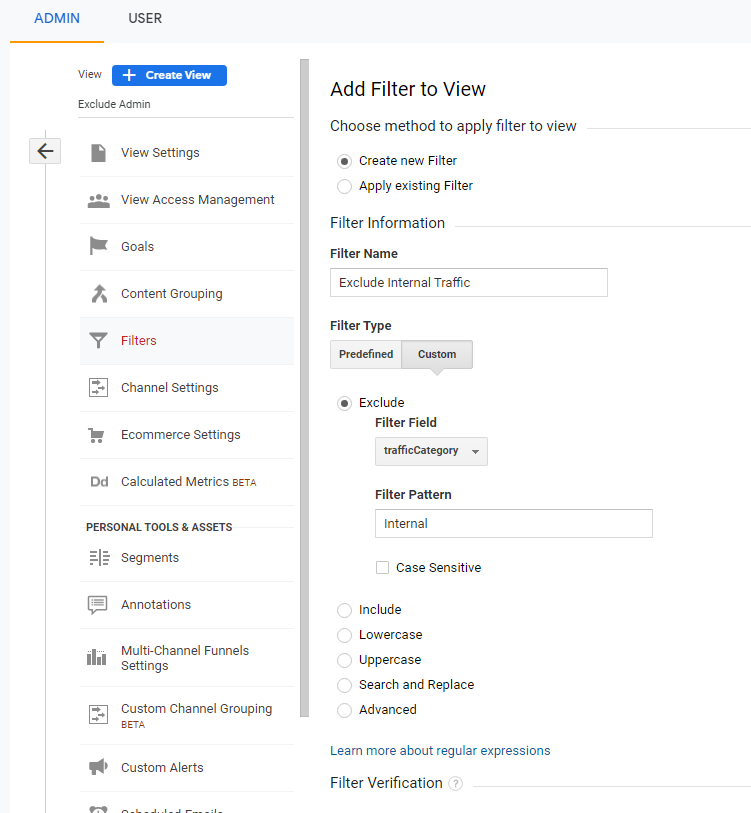
Taking it a step further, you can then use this custom dimension in your UA Segments or apply a filter to completely exclude internal traffic from a particular view.
Wrapping Up
Thanks for sticking through this advanced tutorial. Now that you know how to track internal traffic vs external traffic using a cookie, you can make your data more useful and even exclude your internal users from all of your marketing campaigns.
If you get stuck or run into any issues tracking your internal users, feel free to contact your friendly tracking experts at Intigress.
Happy tracking, or rather, not tracking internal users!
2 Responses
The 1st Party Cookie is definitely much better than IP address lookup. However, browser cookies are often deleted (much sooner than 1 year), and it is a real challenge getting company employees to regularly visit a custom URL with the “internal” parameter.
I think this would be a much better solution, having people self-identify on any page of the website and let them know that this worked by some kind of visual notification.
I’m glad we agree that the IP address is not a reliable method for tracking internal users (even though that’s what Big G wants you to think). While your proposed alternative is visually nice, it still relies on cookies, requires a lot of extra code, and isn’t as easy as our “done-for-you” GTM recipe.
Further, it requires the same amount of additional action from the internal user/employee as adding the internal parameter like we suggest in the article.
As you describe nicely in your article, there are certainly pros and cons to every option and no solution is perfect. In our opinion (and as explained in one of our Pro Tips) the it is best to automatically trigger the internal cookie creation in a way that doesn’t require additional action from your internal users, which may be different for each organization.
TLDR; Creating an internal traffic cookie is still the best way to track internal users at this time.